
Or, “How I made an orchestral sample library in my free time for under $10,000”

Microphone Selection
In the previous part of this series, we looked at the preparation necessary to plan out a sampling session. Actually putting that plan into practice however is a much larger task, leading to and following the recording session itself.
There are many elements which influence the recording process – the quality of the conduction/instructions, the choice of location, even the preamps and converters. However, aside from the performances of the player, the most important aspect of recording is the choice of microphones.
Microphones are like actors, each having a gamut of capabilities and characteristics that define them. Some are articulate or energetic, others mumble in a warm subtone. Some work well in almost any situations, while others prefer one or two contexts. Some cost a small fortune, some cost a nice dinner out. You are the casting director: the art, and science, of placing microphones is to find optimal solutions where the microphone performs its best, and in doing so, supports the desired capture of sound.
Poor or lazy microphone selection or placement is the leading cause of bad recordings. A studio full of $500k in the world’s finest microphones tossed onto stands around the room is as useless as a massive hollywood production in which every character is horrifically miscast.
In this part, we will take a deep dive into the world of microphones, how they work, and what to look for in the ideal microphone for sampling.
First a disclaimer:
While the information and suggestions here are the result of a great deal of trial and error, you should still always try and experiment with microphones and techniques before deciding one is the best for a given situation. If you asked me 5 years ago how I would record x, y, or z, I would probably give you totally different answers than today, and that’s normal.
Likewise, learning how to place microphones is not a talent but a skill. Never, ever forget to listen. Books and diagrams will only get you so far. Your eyes will lie, but your ears will tell you everything you need to know- take the time to get the placement perfect, and you will have a great recording. Be cocky and think you can just throw the mics up and hit record and you’ll spend weeks trying to fix your dumb mistake. Ask me how I know… I definitely have never done that before.

Large Diaphragm Condensers (LDCs)
When one thinks of studio microphones, the LDC often comes to mind. With large capsules of around 1″ diameter, these microphones are known for their balanced sound and usually quite low noise, meaning the microphone does not add much noise of its own on top of the noise it picks up from the environment. This makes low-noise LDC’s a great choice for sampling, especially in home or studio settings.
Tube or FET?
You will find that LDCs broadly come in two types, tube and solid state (FET).
- Tube LDCs represent the range of classic historical designs of microphones from the 1920’s through the late 1970’s, with generally a more limited dynamic range, higher noise floor, added saturation, gradual but significant distortion with high SPL sources, and large, heavy bodies. Tube mics also require a special additional power supply which almost unilaterally require AC power. All of these traits combine to make the tube LDC a difficult choice for location sampling outside of the studio, especially as far as main or room mics are concerned. However, if you are in a quiet studio or recording moderate to loud instruments, quality tube mics can be used effectively without fear of needing to denoise.
- Solid state designs, usually using Field Effect Transistors, offer a number of significant advantages, including (generally) greater linearity, less distortion, higher max SPL, lower noise, smaller size, and lighter weight. It is possible now to get a solid state LDC about the size of your fist and only weighing a couple hundred grams. If you find yourself recording in locations such as concert halls and churches, especially in situations were AC power may be hard to come by, or you need to sample extremely dynamic instruments such as percussion and brass and you’re not a fan of tube saturation, solid state mics are by far the way to go.
What LDC should you get?
My workhorse microphone was for many years the Rode NT1-A cardioid large diaphragm condenser (LDC). It’s very sturdy, affordable, extremely low self noise, and has a natural, fairly flat frequency response that sounds acceptable to good on just about everything. Virtually all of VSCO 2 was recorded on these mics, and for the price they are hard to beat.
The NT1 is an updated variant with an overall more balanced sound which most people will find more preferable. Overall you won’t find comparable performing mics until about $1,000 so it’s a big jump to the next tier.
There are a seemingly wide range of other tempting budget LDC offerings now, but you should be weary of these for sampling. Warm Audio makes some great budget “spin-offs” of popular vintage mics; not quite true to their originals, but still very respectable. However, their mics are all fairly high self-noise, making them a slightly harder sell for sampling. The WA14 for example has such a poor noise spec that they didn’t publish it for years, and I can tell you first hand… it’s not fun when sampling quiet things.
Advanced Audio does a bit better in the noise department. Their microphones are modded Chinese designs, providing a very budget-friendly option for getting within the ballpark of vintage mics with usually a few dB of extra high frequency boost to help suit modern applications.
It is worth trying out a range of mics, to explore your options, but in general, I would stay away from actual vintage mics, which are generally noisy and tend to have poor protection from RF and EMF. It can be very tempting to use the vintage 414 EB’s or original U67’s or some old mysterious tube mics in the studio as room mics, but when you get home and have to clean up the mess of noise they create, it’s a lot less fun.
In general, if a mic has more than 20 dBA of self noise, it’s probably not suitable for sampling. Ideally it should have less than 15 dBA self noise.
As we pass $1,000, we start to find some suitable candidates.
Neumann GmbH’s TLM 102, plus the TLM 103 and 107 are all suitable midrange mics with similarly great noise performance, but they tend to have a rather bright sound profile which is a bit more vocal-centered than instrument-centered. However, an often forgotten wonderful mic in this price range is the TLM193, a cardioid-only, low-noise version of the famous TLM170, an unusually flat and neutral design well suited for general recording and a favorite on brass.
From Thuringia to the south of Berlin, the Microtech Gefell M930, 940, and 950 are all very suitable, ultra low noise microphones and far more compact than the clunky Rode NT1 and even the TLM193. I now daily use the M930Ts (transformer output), which are very pleasing sounding without completely breaking the bank (or back!).
Ehrlund also make the very fine EHR-M1, of similar size and capabilities to the Gefell and Neumann models but a response far into ultrasonic range if you need SDC-like extension with LDC-level noise floor. Milab also make some impressive mics around this range as well, such as the DC-196.
At the high end, the Neumann TLM170R is one of the very best options- a neutral, easy sound, multiple patterns, reliable performance, and a fairly compact size. It is much better suited in response and noise performance towards instrument sampling than, for example, the famous U87 or even U67. The U89 is also a great choice as it uses the same capsule as the TLM170, but is edging towards the noisier side of things. Also highly performing are the Microtech Gefell UM930, UMT800, Audio Technica AT5047, and the Pearl ELM family (ELM-A, -B, -C, and -T).
Microtech Gefell’s alternatives in this range are the UM930 and UMT800.
If tube mics are available, clones or originals of the Telefunken ELA M 251 and Neumann M49 are generally the best choices for instrumental recording. However, these mics should not be used too far from the source or at least, not on very quiet sources, as their noise performance, even modernized variants, is often on the edge of acceptable.
If using multi-pattern mics or choosing from fixed pattern mics, do not fear working with patterns like wide (sub) cardioid or supercardioid. The Gefell UMT800 is just okay as a cardioid but impressive as a wide cardioid, for example. When used at close distances, even figure-8 can often be usable on multi-pattern mics while giving useful directionality/isolation.
A small footnote should be left for 1-inch measurement capsules (omnis), such as the Gefell MK102 or ACO Pacific 7022. These microphones feature all the benefits of pure omnis while gently focusing the high frequencies, reducing the unpleasant characteristics of a space, and offering exceptional noise performance. However, usually HF response is limited, and the acquisition and use of measurement microphones in recording (in particular 1-inch capsules) can be both expensive and challenging.

Small Diaphragm Condensers (SDCs)
The SDC is the workhorse of orchestral and location recording. Small, accurate, and with very consistent performance off-axis (to the sides), these mics are easy to use and work very well in compact coincident and near-coincident arrays where large diaphragm mics often struggle to sound their best.
Small diaphragm mics are available in many patterns from omni to figure-8. While most studio folk reach for cardioids, in sampling sometimes supercardioid can be more useful for rejection/focus. Wide cardioid on the other hand is often favored by classical engineers for its superior low frequency response to cardioid and usually very even sound off-axis. Figure-8 can be useful in special cases of noise impinging from the sides (such as in a room with adjacent/axial noise sources).
The most affordable budget SDCs are the Line Audio CM4 or CM3, followed closely by the sE Electronics sE7. However, I would recommend jumping over these mics in favor of the sE8’s, which are quite neutral, reasonably low noise, and still quite affordable. You can even get them with additional omni capsules to give an extra option! The discontinued Aston Starlights are quite decent and unusually full sounding, but extremely large and heavy to the point of being annoying to use.
Most if not all other budget SDC’s are wildly bright and papery sounding, or have middling to poor noise performance. Even semi-premium options like the Rode TF5’s I find disappointing (too bright/harsh for all but a handful of uses). Many are clones of or based on the design of the famous Neumann KM 84, especially the sE8 and Rode NT5. There are also a few unique designs like the Mesanovic SC1 (surprisingly good but bright omnis) or Samar MG20 (dark) but these overall don’t really cut it compared to the competition.
Like LDC’s, once we get to around the $1000 mark, we start to find some very promising microphone models. The first type to consider is the Sennheiser MKH 50 and MKH 30. These are supercardioid and figure-8 respectively, remnants of the once-great MKH xx family, but have incredibly low noise and linear response thanks to their special RF circuit design. For sampling, these mics are hard to look beyond even with more premium options for these reasons.
Also around the $1000 mark are the Neumann KM 18x series. However, I find these to be very bright, especially if you are a young person with good hearing. Microtech Gefell produce the M300 series (300, 310, 320, 330) which are overall smoother than the Neumanns, but are not particularly impressive for the price (aside from the 320, which is a very good copy of the older and highly regarded KM 63/83). Finally sE has a high end offering, the RN17’s, which I have used for many years in Jazz recording on just about anything, however, these microphones are quite noisy at 18 dBA and despite having been used in several major woodwind sample libraries, I would be cautious using RN17’s for anything other than percussion.
The top end of the market is taken up by the great classical recording mics of Schoeps, DPA, and Sennheiser. Most classical engineers use at least one of these systems. Each system has their advantages and weaknesses in size, noise, and sound, and there just isn’t enough room to go over every nuance of that here. Needless to say, all of the microphones from these brands are very well suited for sampling professionally, and if you have them at your disposal, the only issue you will probably be concerned with is choosing which stereo array you prefer.
A special mention is in order for the Sennheiser MKH 800. This microphone is all around classical recordings and is one of the most linear, flexible, and low noise mics in existence, easily competing with many LDC’s. A rare side-address, dual-diaphragm SDC, this mic can achieve many different patterns and fill many use cases from spots to outriggers to even mains and rooms.
Also of note here are the Josephson C617SET and its “thin” cousin the Gefell M221, which are superb omni measurement microphones which match the specs of the great brands above. On a budget, ACO Pacific’s MK224PH or DPA’s 2006 series are suitable electret designs. Earthworks can also be considered, but comparatively have quite poor noise specs (around 20 dBA for most models) which make them less desirable for critical sampling.

Ribbon Microphones
In the world of sampling, ribbon microphones can be sometimes overlooked due to their low sensitivity and thus risk of high noise if not used carefully and in the right contexts. However, some brands have strongly identified with the sound of ribbons, such as Spitfire with the Coles 4038’s.
My main ribbon microphones are all by Samar Audio Design. In particular, I often utilize the VL373A (stereo active ribbon, blumlein pattern) or VL37. Their AL95’s are also a small, affordable option well suited for a compact setup. I find Samars to be more linear, pleasing, and easier to work with than any other ribbon on the market and they have consistently won or placed very highly in ribbon mic comparisons when judged for linearity of response.
Another good option for ribbons is AEA. However, their microphones are considerably larger and heavier than Samars with few advantages to speak of. They do however produce both brighter (“modern”) and darker (“traditional”) voiced ribbon mics, as well as mics with a low frequency roll off designed for close-working, such as spot mics or for singers.
On the affordable side, it’s a bit of a mixed bag. sE makes some quite decent ribbons with a more modern sound, while NoHype Audio produce some darker ribbon designs. However, generally expect to pay about $1000+ for a decent ribbon.
Keep in mind that most ribbon mics are of the darker “old ribbon” sound, which is rather muffled and honestly pretty undesirable for sampling situations where accuracy and transparency is the name of the game. Only a handful of ribbon makers are creating articulate, neutral microphones suitable for sampling.
For example of one case of personal regret, Royer is extremely well known in the US for their ribbon mics, however I do not find them particularly well suited for sampling or classical recording for three reasons: (1) they’re very colorful and not linear, (2) they are asymmetrical designs which sound differently on front and back which makes them inferior in blumlein use, and (3) they are way more expensive than all the other options but no better in any way. I have used their R101 and later R121’s for many years and genuinely do not consider them to be good microphones, especially compared to the likes of Samar and AEA.
The Coles 4038’s are very good, but I still personally find them lacking compared to the VL37. They are also a very old design with unoptimized construction originating in the 1950’s, not a contemporary design using modern materials and techniques. If they are available to you though, they are still worth using and much superior to Royers sonically.
It’s important to note lastly that passive ribbons require specialized preamps to get low enough noise out of them for sampling. I use the Integer Audio RMP2 for this, but AEA make some great ribbon mic preamps of comparable quality but additional features for sound tweaking. While active ribbons are higher output, they are not always lower noise than pairing a passive ribbon with a specialized preamp and thus should generally be seen more as a stopgap measure if you do not have the space to bring or use a separate preamp.
It is absolutely unworkable to use the integrated preamps in a budget audio interface (e.g. Scarlett) with ribbon mics or dynamics. Save yourself the nightmare of trying to remove all that hiss and use a proper preamp (<-129 dBA EIN @ 150 ohms).

Other Microphones
Dynamic microphones such as the SM57 are of limited use, but occasionally might be required for sampling percussion to match a specific idiom. This is actually another case where investing in a low noise preamp is important, as the noise floor of the preamp almost always masks the noise floor of most passive microphones, and impedance plays a large role in determining the response of these microphones.
Stereo microphones are generally of limited use in sampling, but can be handy if space is an absolute premium or to cut back on setup time (e.g. aforementioned Samar VL373A).
Surround or ambisonic microphones can be quite fun, but I have yet to find one that has suitably low noise, plus, the infrastructure for decoding ambisonics is not yet widely available in DAWs or samplers so they can be a bit tricky to work with 4-channel audio for end users.
You can of course build your own ambisonic array; it simply requires 2-3 fig-8 mics and one very good omni, with one fig-8 and omni pointed straight forward, one fig-8 pointed side to side (like mid-side so far), then one optional fig-8 pointed up (height channel). This is Ambisonic B Format ready to go, no decoding or tricks necessary. However, the exact placement and design of the array, and mics used, will greatly affect the final result’s imaging and usefulness.

Microphone Specifications
When shopping for mics, you should be aware of the following specifications:
Frequency Response/Frequency Range (Hz – kHz)
This specification, commonly quoted, is actually pretty useless. What you should look for is a frequency plot, like this:
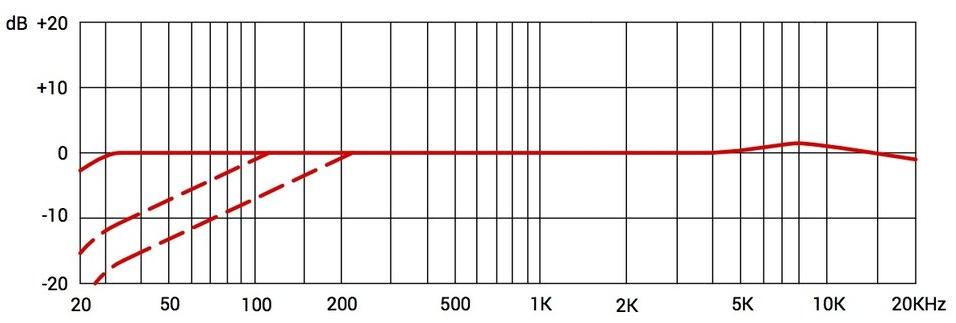
Note that such frequency plots are generally ‘touched up’ by the marketing department to look smooth. Also keep an eye on the scale on the left! A very large scale (e.g. 50, 60, dB total) shows an attempt to conceal a far from linear response, while a very narrow scale (10, 20 30 dB) is a sign that a manufacturer is serious about the linearity of their product.
You also know a mic is genuinely smooth in its response when the designer is unafraid to list the smoothing, especially if it’s 1/12 octave, rather than just “magical marketing shape” like you see above.
Note that sometimes you DO want a non-linear frequency response! For example, with vocal mics, it is common to have a little boost to the high frequencies, and many mics cut off some super low frequencies to make them audibly cleaner sounding. Similarly microphones designed for recording in wet/rich acoustic spaces like churches and concert halls have a boost in the high frequencies to help compensate for the loss in high frequencies with distance.
In other cases, there’s a particular ‘known sound’ common to a certain mic that has been ingrained, e.g. SM-57. It’s definitely not linear, but people like it anyway!
Polar Pattern
The Polar Pattern describes the way the microphone responds to sounds from different directions. Different patterns have common names, as shown on the chart at the start of this section, along a gamut running from omnidirectional (picks up all directions) to cardioid (rejects to the rear) to figure-8 (rejects to the sides).
Having mics with different patterns than just cardioid or just omni allows us to “focus” on a source, or to reject unwanted sounds from a particular direction or even directions (in the case of figure-8 and supercardioid!). This is useful all the time in sampling where noise can ruin takes or even entire sessions, and in situations when we can’t exactly find the greatest space to record in, and have to settle for something which has unpleasant reflections or perhaps too much reverb.
While we all like the shorthand of calling a mic ‘cardioid’ or ‘omni’ or even ‘supercardioid’ and ‘subcardioid’, and most can draw the “idealized” form of each or at least picture it in their head at the mere mention, real mics are not actually exactly the described pattern.
Many popular vocal mics are genuinely supercardioid but listed as cardioid, perhaps because the latter is more familiar to a layman. Even if a mic’s polar pattern is true to its shape at 1 kHz, that shape generally changes across the frequency range, usually narrowing as it reaches the high frequencies:
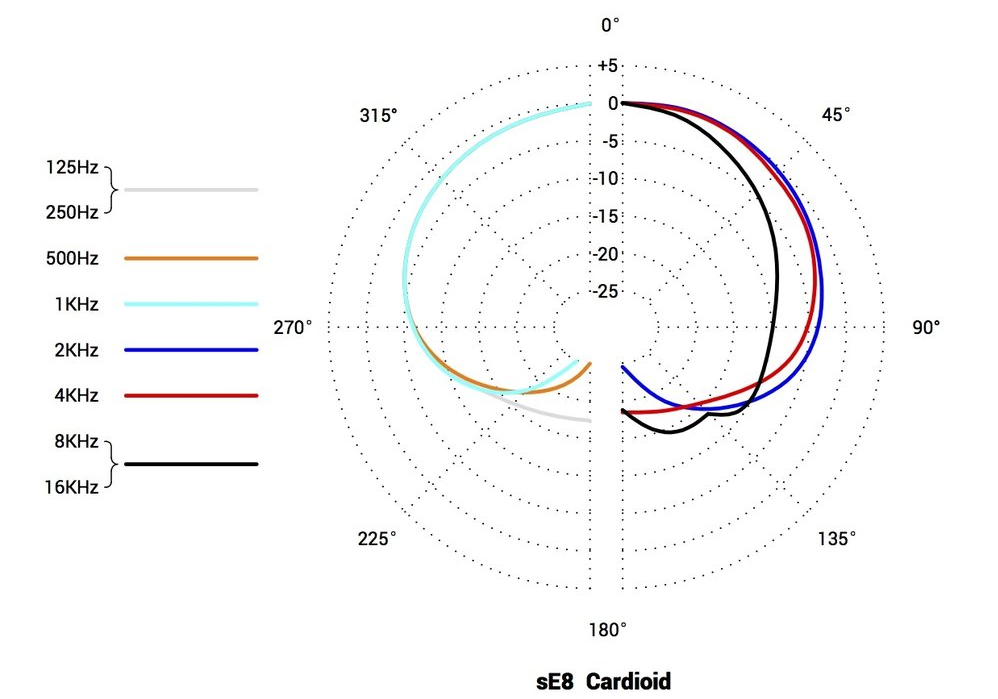
While the sE8 and other SDC’s tend to look pretty consistent like this, a large diaphragm condenser, in particular a multipattern one, tends to be mostly omnidirectional at low frequencies, becoming more directional and eventually “falling apart” to supercardioid at high frequencies, down to a typical narrow lobe of ultra-highs. This is what leads to the phenomenon of off-axis coloration.

Equivalent Noise Level (dBA, dB)
Equivalent Noise, or ‘self noise’, is how much noise the electronics and capsule size contribute to the signal before it even gets to your preamp. This is relative to a fixed ‘0’ point for all mics, so you can compare between manufacturers. Most use ‘A-Weighting’ (designed with the ‘A’), which looks better than unweighted.
Some manufacturers also use the CCIR 468 specification, which is about 8-10 dB “worse” looking vs. A weighted, but generally accepted to be much more accurate to how “annoying” a noise is perceptually than A weighting, which is more concerned with making numbers look good for consumers than actually quantify perceived noise.
Very poor self-noise is in excess of 25 dBA, poor is 20-24 dBA, average is 15-19 dBA, low is 11-14 dBA, very low is 10 and below. The lowest possible self-noise is about 3.5-4 dB, as you’re actually up against the natural Brownian motion of air molecules at that point.
Generally anything at or below 15 dBA will be more or less inaudible in most situations. Problems may arise with mics in the area of 18-20 dBA self noise when working with quiet sources.
Max Sound Pressure Level (SPL)
Max SPL is at what sound pressure level the microphone reaches the distortion level of (usually) 0.5% THD at 1 kHz. 120 dB is low, ~130-140 is average, and 150+ is very high. Dynamic microphones have extremely high max SPL, usually not listed.
Note that 120 dB SPL is still very, very loud; listening to such a sound for more than 15 seconds will damage your hearing. This measurement isn’t terribly important in most recording situations, so long as it’s above 120 dB SPL. Having a very high max SPL mic will however ensure that loud transients and signals will not distort, ensuring an accurate capture.
In most condenser microphones, SPL is generally determined by its circuitry rather than the diaphragm, though I’ve found small diaphragm mics, many being designed for recording percussion at close quarters, tend to have slightly higher Max SPL than their large diaphragm brethren.
Sensitivity (mV/Pa or dB re 1 V/Pa)
Sensitivity seems pretty self-explanatory on the surface. How many volts do you get out for a given sound pressure level? mV/Pa reflects this explanation better, but overall I find dBV to be a more useful measurement, as it’s the sensitivity difference between mics.
TL;DR: more sensitivity = better for weaker preamps (they have to do less ‘lifting’); less sensitivity = better for louder signals (they generate less signal).
A very low sensitivity is in the area of 2-10 mV/Pa or -52 to -38 dB re 1 V/Pa. This is very likely to require a specialized, ultra low-noise preamp, such as one designed for passive ribbon microphones, to capture its full dynamic range. Once above 20 mV/Pa or -32 dB re 1 V/Pa, you’re more or less safe to use any preamp you wish.
Above 50 mV/Pa or -24 dB re 1 V/Pa, you have to be a bit careful with the max input level of your preamp and converter as it could easily pass +4 dB on some extreme transients (over 122 dB SPL), but this is usually only found in specialized mics like measurement omnis.
Impedance (Ohms)
The impedance of the mic is generally of little consequence so long as it is under 300 Ohms. Some old mics or ribbons will be at or in excess of 600 Ohms which could cause problems on preamps below 3kHz input impedance.
Ideally your interface or preamp should have an input impedance of at least 10x the output impedance of your mics. Having a very high or very low impedance beyond this ratio can brighten or darken the mic, as well as alter its sensitivity.

Microphone Positions: Stereo Arrays
Virtually all standard microphones are mono, meaning they record a single noise source from a specific point in space. Mono used to be acceptable for samples, but is now quite rare- only a few boutique and specialty developers still use mono, and that’s only because they use convolution reverbs to re-create stereo space. Instead, we must use sets of microphones, called Arrays, to create stereo positions.
The most basic array is called a Spaced Pair, or AB. This setup consists of two microphones placed anywhere from six inches to six feet (0.2 – 2 m) away from each other roughly perpendicular to the sound source. The optimal distance depends on the source’s size and distance from the source, but generally the area of 0.5-1m is optimal, beyond which a middle mic (e.g. decca tree) is increasingly necessary.
The spaced array takes advantage of the fact that our ears partially rely on differences in arrival time of a sound (“phase difference”) to tell where a signal is. Sound reaches each mic at a slightly different time and with a slightly different combination of reflections from the space, resulting in the stereo sensation.
The obvious drawback of this is that IF someone were to sum the pair to mono, comb filtering caused by phase differences would occur, resulting in usually a thin, unpleasant tone.
Nearly any type of microphone can be used in this array from omni SDC’s to figure-8 ribbons, but I prefer large diaphragm condensers, which can have incredibly low self-noise and are designed to record directly to the front very effectively. Large diaphragm condensers are comparatively poor in other stereo arrays, so if they are all you have to work with, this is often the best choice.

At the other end of the spectrum is XY. This array consists of two cardioid (typically small diaphragm condenser) microphones placed in a cross pattern with 90-135 degrees of separation. The diaphragms (the mesh heads at the front) should overlap as close as possible, thus creating a “V” shape, with the arrow pointing towards the sound source.
This type of array is called coincident, meaning the sound source arrives at roughly the same time to both microphones. Thus, the difference in the signal level (volume) is primarily what creates the stereo field. An XY array is focused and clear, but compared to spaced pairs, often lacks a sense of space and reality.
XY has a cousin called Blumlein, which can be achieved using figure-8 pattern microphones, usually symmetrical ribbons, instead of cardioid/supercardioid, conventionally at 90 degrees separation. Blumlein has no rear rejection, but is a super fascinating pattern because it widens the sound source significantly, while also being collapsible to mono. Essentially, whatever is in the front 90 degrees is spread over the entire listening scope- a source 45 degrees to the left becomes hard left; a source 45 degrees to the right becomes hard right.
This is fantastic for making a section sound big and beefy (especially when using ribbon microphones), but can be problematic for sampling as any movement by the player can be multiplied massively if the mic is close, and it offers no rejection to the rear in a noisy space.
Blumlein actually closely matches the conceptual behavior behind pan knobs, relying predominantly on volume difference rather than timing for the localization of the sound in the stereo image.
The third and fourth types of array is the ORTF and similar NOS. Both again use cardioid or supercardioid (almost always small diaphragm condenser) microphones, but this time the rear ends of the microphones form the corner of the “V”, with about 110 degrees of separation at the rear with about 7 inches (17 cm) of separation at the capsules for ORTF, and 90 degrees of separation at the rear with about 12 inches (30 cm) of separation at the capsules for NOS. A narrower variant of NOS exists, at about 10 inches (25 cm), called EBS.
Both of these approaches are near-coincident, and thus will convert to mono acceptably while having a bit wider of a stereo image than XY, but not as spacious as A/B. It roughly approximates human hearing. These arrays are very common in modern orchestral recording, in particular ORTF (though I find NOS is easier to set up on location due to the simple angle and easy distance) and provide a really enjoyable stereo image with consistent, repeatable procedure and results and very clear separation of sources.
For a compact, portable sample recording setup, a pair of SDC’s like sE8’s or Schoeps MK4 w/ CMC6’s and a stereo bar would be extremely effective.


Three-Mic Arrays
While arrays comprised of two mics are generally optimal for sampling, three mic arrays are more commonly used in orchestral recordings and thus should be considered for recording ensembles or in nice sounding spaces where you want to show off the room and imaging of the mics.

First we must consider the famed Decca Tree. This consists of three microphones- two omni SDC’s arranged just like a wide spaced pair, but with a third mic placed forwards by 1/2 the distance between the two main mics, forming a large triangle pointed forwards.
Commonly, the spaced pair portion is 2 meters or yards apart, and the forward mic is one meter forward from that center point. This can be decreased if recording a smaller ensemble.
It’s important to note that the Decca Tree was never really a fixed standard, but rather the 3-mic tree is both (1) a portion of a larger overall recording setup usually with outriggers and various spot mics, and (2) one of several viable implementations used by Decca engineers over the decades. See “Recording in the Decca Tradition” for great details on this.
It should also be noted that the Decca Tree today is largely synonymous with the Neumann M50 tube SDC microphone, a rare, somewhat mythologized microphone with a storied history which go for a massive sum today. However, other microphones such as modified omni SDC’s can be used, or even wide cardioid or cardioid mics.
The benefit to the Decca Tree is pretty significant- a stereo signal that should theoretically retain its mono compatibility, and it is thus commonly employed in orchestral recordings, placed above the conductor about 10′ off the floor. You get exceptionally wide, spacious sound from the side mics but a strong, focused core from the center mic.
While Decca Trees are quite famous, the trouble of obtaining either a working trio of M50’s, or using special modified omni SDC’s, not to mention the large spread of the array makes it somewhat impractical for quick location recording, and the typical use of omnis make it challenging for sampling in noisy situations.
In these situations, cardioid or supercardioid variants of these arrays can be used: Optimal Cardioid Triangle (OCT) and INA-3 (German acronym for Ideal Cardioid Arrangement).
INA-3 is the smaller of the two arrays, only slightly wider than NOS. This makes it infinitely easier to set up with small, affordable stereo bars and visually unobtrusive as well. A left-right pair of cardioids, spaced 35 cm, face the sides of the stage (180 degrees, but can be narrowed to point directly at the corners of the stage/source). A middle cardioid is 17.5 cm (1/2 the width) forward, facing directly front.
OCT is a larger array, but flexible in implementation. Unlike INA-3, it uses supercardioids for the side mics, which are spaced anywhere from 40 to 100 cm (15-40″). The center mic is traditionally just 8 cm (3″) forward of the side mics, but some engineers prefer to place it up to 40 cm (15″) forward instead. The advantage of this array is that the two side mics reject the center of the ensemble/source better.

You will have to experiment with each array setup to find which one you like the most. Often times, different arrays will provide different sounds, and the decision may rest solely on the instrument and space you are recording in. In other cases, you will be limited to the arrays possible with the equipment you have access to. For example, if you only have LDC’s, working with a spaced array may be your best option.
Mic Placements in Practical Use

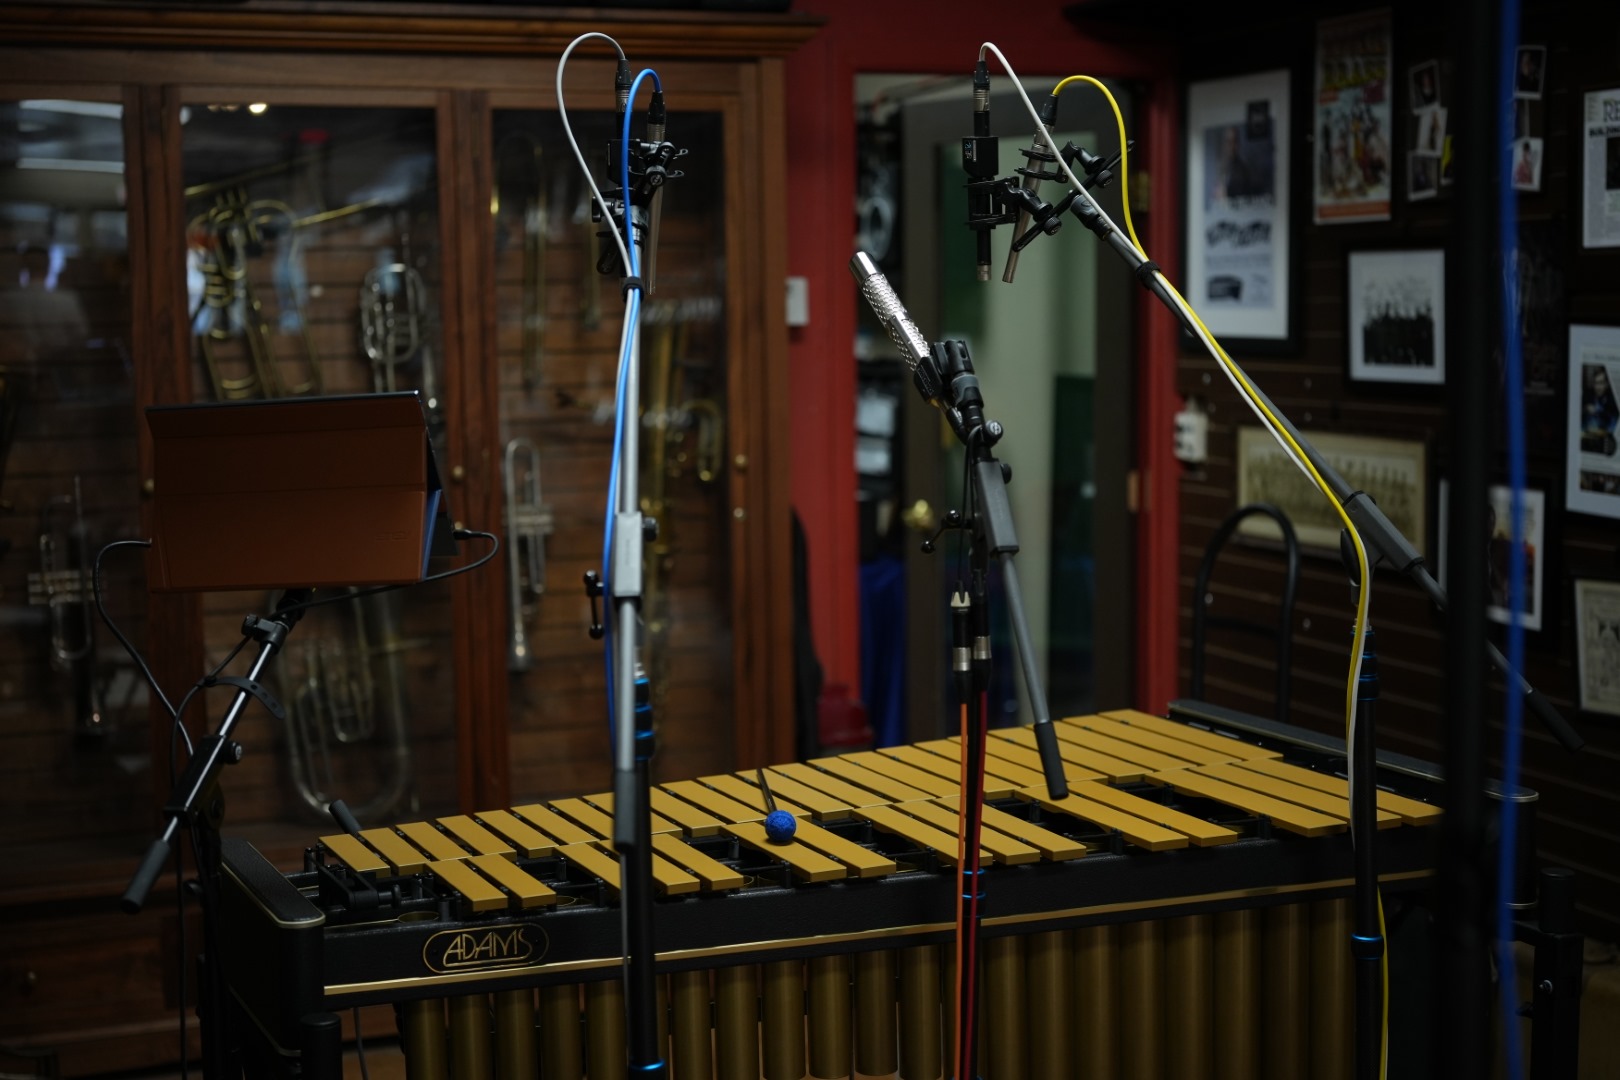
Here’s a photo of the recording setup from Tubular Bells II. You can probably already make out some features of this recording session, such as the small diaphragm condensers closer to the bells, the large diaphragm condensers on the stereo bar farther back, and the stereo ribbon mic in the center of the stereo bar.
Rode TF5
Cardioid
Overhead
Spaced Pair
Boosted HF
15 dBA
Gefell M221
Omni
Mid
Spaced Pair
Flat
15 dBA
Gefell M940
Supercardioid
Main
Spaced Pair
Slight HF boost, LF cut
7 dBA
Samar VL373A
Figure-8
Main
Blumlein
LF boost
~18 dBA
The main thing to consider here is why certain mics are chosen and placed in certain positions. Any amateur can take a closet full of mics and throw them around a room… I would know, I was there myself over a decade ago. Recording though, is about making critical choices that optimize the chance of success and the degree of flexibility available to the end user.
The first mics we here are the Rode TF5’s. These are bright, articulate SDC’s with a tight cardioid pattern. They are placed directly over the tops of the bells, so that they capture the percussive strike of the hammer. These mics are intentionally borderline useless on their own; their job is to be mixed in to provide the user the ability to adjust the amount of articulation in the sound.
Next we have the Gefell M221’s. These are specialized measurement microphones with fast transient response but also very linear low frequency response (down to 7 Hz!). Since these are omnis, we want to place them closer than if they were cardioids, in order to avoid them sounding too roomy. They provide a sense of balance between articulation and body, a very detailed but still full sound.
Third are the Gefell M940’s. These are fairly flat supercardioids with a slight air bump around 10-15k and a recessed low end below 200 Hz. They are chosen as main mics because they have extremely low noise and capture a fairly neutral sound of the instrument while also rejecting a lot of environmental noise in this imperfect space.
Lastly we have the Samar VL373A. By comparison to everything else here, this is a “color” mic, here to provide the rich, full-bodied sound only a ribbon mic can achieve. It is placed in line with the main mics so that combining them will result in minimized phasing/comb filtering.
For another comparison, let’s examine the two pairs of SDC’s on this vibraphone, the Gefell M221’s and sE RN17’s from before! This time, I set them up to be adjacent to each other, so its about as close of a comparison as we can get.
Keep in mind here that the M221’s are omnidirectional while the RN17’s are using the supercardioid capsules (as directional as possible basically). What we’re hearing here is largely the difference in characteristics between directional mics and omnidirectional mics, as the size of the diaphragms on these mics are almost identical.
First, here’s the M221’s, followed by the RN17’s:
Why on earth would we go through the trouble of recording these two mics if they are right next to each other?
With this setup, it is possible to “blend” between the patterns, allowing the user to decide what polar pattern they would like used, be it omni or subcardioid or cardioid or supercardioid. All are possible, and anything in between. This way, the end user has complete control over the setting and placement of the instrument, and every mic has a distinct purpose in the completion of the tone.
This is where understanding the instrument you are sampling is paramount. Know where the sound comes from, what direction(s) it radiates, where on the instrument it is rounder, in other locations airier, etc. I like to think I know a lot about instruments, but before I sample them I check with every book I have on recording techniques and several orchestration manuals just to make sure I know what I’m talking about and have some rough ideas going in, in case what I have planned mentally doesn’t come out right and I need a new angle.
Also understand your mics. Often when a colleague asks me about why x famous mic did not perform well on this sampling session, it is simply because it was the wrong choice for the job. It is relatively easy to hear that despite these being two sets of precision mics in almost identical positions, there is still a noticeable difference in tone and even in the stereo image.
The way a supercardioid, figure-8, or cardioid can “zoom in” on or isolate something relative to a wide cardioid or omni is a useful tool which may come in handy. On the flip side, sometimes you need the extra sense of space and extended highs and lows that only a true pressure omnidirectional microphone can provide.
Finally, avoid just putting mics out for the sake of putting out mics. You do not need 12 pairs of mics to sample a piano or a cello accurately. Even a single pair of mics, properly placed, can do a better job than 6 poorly placed pairs. This is a lesson I have learned first hand many times and still make the mistake of breaking sometimes. It may sound impressive to have a lot of mics, but when the user needs pages of mics in your mixer, you’ve absolutely gone too far.
These are just some of the considerations we go through when choosing microphones for a sampling project. With practice and patience, it is possible to build a good sense for how a certain microphone will perform in a situation. It is always important to make adjustments, experiment, and learn from your mistakes (and successes!).

Audio Interface
An audio interface is a device which generally unifies three historical devices into one:
-
- Preamplifier: the preamp takes the mic’s analog signal and amplifies it, raising the volume to the amount necessary to properly gain stage with the converter.
- Analog to Digital Converter: the A/D converter takes the analog signal and converts it into a digital, usually PCM signal readable and storable by a computer.
- Audio Interface: the interface allows the signals output by the converter to be sent to your computer, nowadays over USB or Thunderbolt (historically over Firewire or even via a PCI add-in card).
Audio interfaces range from $100 up to $5K+, with varying degrees of quality, numbers and types of inputs, and specs. It is also worth noting that some interfaces, in particular very high end ones, may not have preamps, though generally most do.
Before we progress, let’s take a moment to consider the relationship between the preamp and the A/D converter, as it is very important to recording.
Preamp
When we put a mic in a room, we’re continuously measuring the sound pressure changes at that point in space. Those pressure changes get turned into a relatively small change in voltage.
The preamp takes that small change in voltage and amplifies it to be orders of magnitude larger. It’s still not much, but at least we can do things with it now! Keep in mind, any noise the mic picked up or generated, plus any noise the preamp generated, is now part of the signal too. If the mic had an initial noise level of “-100 dB” and we add 40 dB of gain, even in a perfect system, the new noise level is “-60 dB”.
However, in most recording cases, unless you are dealing with both a loud source and a quiet space, the noise floor of your space itself, that is, all the things around you (A/C system, cars outside, neighbors walking by, lights humming, the existential screaming of the universe, fridges running, etc.) will make more noise than the noise floor of even your microphone… much less your preamps.
A/D Converter
Now the converter takes that signal and at a set time interval called the Sample Rate, assigns a digital value approximating the voltage measured at that point. (it’s a heck of a lot more complicated than that, but this darn thing is long enough as it is…) Consider that the converter behaves a lot like we do sampling stuff: we take something analog and continuous and have to split it up into little discrete bits (well, ah, literally bits in this case). Fortunately for us, the converter is insanely good at its job. However, even the best converters have their limits: there’s a certain point where they just can’t resolve the differences anymore, much like a human trying to read 6-point text.
So, the converter has a minimum level it can distinguish to pick up, while the mic itself is always picking up a level of noise, which is then boosted by the preamp along with the signal. In most typical locations, with a mid to high sensitivity mic and a signal below 100 dBSPL, you’re going to be picking up room/environmental noises before you get even close to converter noise.
That doesn’t mean good converters and preamps aren’t worth it; for lower sensitivity mics, quiet environments, loud sources, and in areas like frequency response and phase linearity they are undisputably better; it just means you don’t have to buy the best interface in the universe to make a decent sample library.
Generally, there are three sections of the interface market: low end, from $100 to $500, mid from $500 to $1500, and high-end, from $1500 up.
Low end interfaces, which range from 1 to 8 preamps generally, have characteristically poor noise performance (about -90 to -100 dBFS minimum noise) and their preamps are generally weaker, meaning a low-sensitivity microphone like ribbons and dynamics are going to come across as noisy. When I was just getting started, we tried a passive ribbon microphone with my Focusrite Scarlett 18i8 (Gen 1); we had to push the gain to its max, and it was horrendously noisy! We tried using an ART Tube MP, a little $50 tube preamp you can get just about anywhere, and suddenly that noise cleared away. The Tube MP was built to handle the kinds of low sensitivities and high impedances of ribbon and dynamic mics and is able to provide lower noise in such cases.
You will find incremental improvements in each price range of interface in terms of the abilities of the built-in preamps and the A/D conversion. The preamps in my current high end ‘daily driver’, the Antelope Orion Studio 2017, effortlessly provide gain to even my passive ribbons without going too far up the knob, and the converters are experientially about 8-12 dB quieter than the ol’ Scarlett.
High-gain, low noise preamps aren’t necessarily a cure-all either; set up your audio interface and plug in a mic like you’re going to sing/talk/play into it and open your DAW like you’re about to record. Set the right level by playing a little and adjusting the gain until it’s 8-12 dB below clipping on the meters in your DAW. Now be EXTREMELY quiet and keep watching the meter. Where does it flutter around? -40 dB? -50 dB? Maybe even -60 dB or below? Even the cheapest pro interfaces’ A/D converters sit around -90 dB on meters. Best case scenario, top-shelf pro interfaces top out around -112 dB on meters.
However, that doesn’t mean a pro interface is useless; it is entirely possible to record a dynamic range over 90 dB when recording very loud things like percussion, brass, or close mic’d amps. On top of that, better converters can help if you set gain drastically too low, recovering more quiet details. Preamps in pro interfaces also provide significant benefits with high-impedance or low sensitivity mics as discussed previously.

Interface Recommendations
For starting out, something like a MOTU M2/M6 or Focusrite Scarlett 2i2/18i8 is a solid starting choice. There are a ton of nearly-identical interfaces in the budget price range. I would generally advise buying from a reputable, known brand: Focusrite, Behringer, MOTU, PreSonus, Tascam, Audient, SSL, etc. Compare the features, prices, and reviews to pick the device that makes the most sense for you and your current setup.
For something portable, that can be used without needing a computer, you can use a portable recorder such as the Zoom F series, or the Sound Devices MixPre II series. All of these also can be used like interfaces, plugged into a computer, as well as recording on their own.
I for example often use the Zoom F8n Pro for location recording, because like the MixPre II series, it is a 32-bit float recorder and very compact, and also can be powered easily with equally portable batteries such as the SmallRig VB50 or VB99 (which also have USB C and A ports to power your laptop or other devices!).
32-bit float recording prevents the loss of signals which pass zero dBFS (i.e. would normally get “clipped” by a converter), so they can provide a very safe way to record in unpredictable or rapidly changing situations. While not available in most audio interfaces, Zoom’s UAC-232 and UAC-832 are some of the first to have this ability.
Above that are various models by RME, Lynx, Merging, Universal Audio, and Antelope, who also have higher-end products.
Advanced Note on Preamps
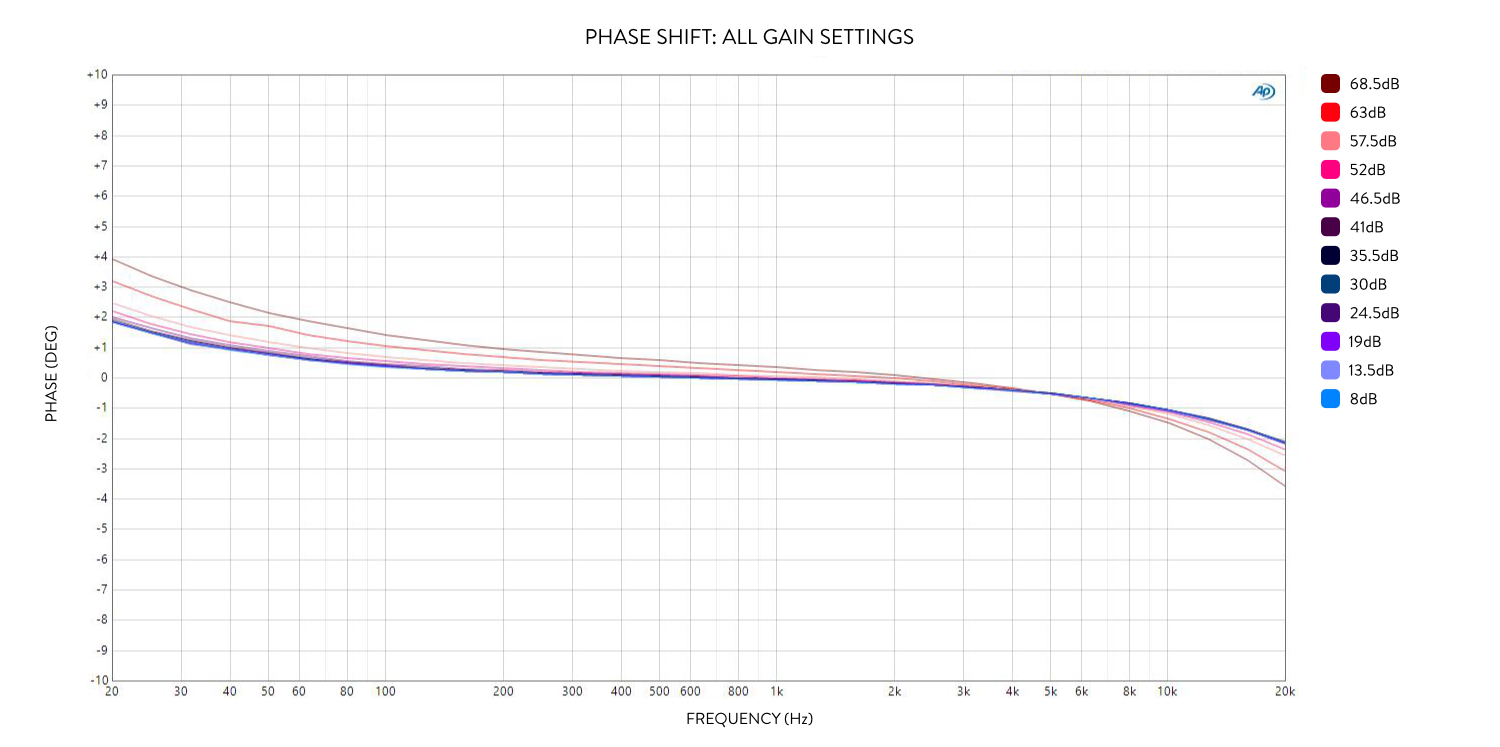
While it’s convenient for me to talk about preamps as ‘noisy’ and ‘clean’ or ‘weak’ and ‘strong’, it’s important to note that preamps are actually massively more complex than that. Preamps delay different parts of the signal more than others at higher gain levels, meaning a cheap preamp with one mic turned to full gain and another next to it at low gain will not be completely in phase with each other across the frequency range, even when you compensate for gain in post (try it for yourself!).
This graph from Cranborne Audio shows phase shift due to frequency on their relatively excellent Camden pre; the phase shift values will be massively worse with cheaper preamps, or if you have a Highpass filter engaged on some channels but not others:
Note that there is a hard limit to how much gain can help; as mentioned before, every mic produces some minimal noise just from existing (oof), as well as pick up room noise. In a noisy space, the room noise will be significantly higher than the mic’s own noise. Preamps also generate a small amount of noise on top of that, focused towards their lowest gain levels. Finally, converters have a more or less fixed noise floor.
Try an experiment: set the gain of your preamp to 0/minimum possible, and pull up a meter capable of displaying down to the level of the signal here. Chances are the meter is displaying something between -94 and -110 dBFS. Turn up the gain a tiny bit and let it settle for a second (it may jump a little on turning up if the gain controls are analog and non-stepped). It should settle down to pretty close to if not the same. Continue to do so, and eventually the noise will appear to rise! Crank it all the way and the noise shoots up!
Oh no, turning up the gain past [~20-50%] increases noise!!!
Well, actually it doesn’t… that noise was there anyway, it was just masked by the worse, fixed noise of the A/D converter. In almost all preamp designs, the noise actually increases slightly slower than the signal does, meaning the signal to noise ratio actually is better at higher gain.
On the other hand, preamps respond non-linearly with their amount of THD+N (total harmonic distortion + noise, or the summation of all the ‘other stuff’ in your signal). The best THD+N figures are generally at medium gain, about the middle of the dial, but that isn’t always true; again, each manufacturer or design style of preamp can have that optimal gain point somewhere else.
So, we can make a few observations:
-
- Preamps perform their best usually around mid to high gain.
- Keeping preamps unnecessarily low gain can cost you if their noise floor is below that of the converters.
- Don’t be afraid to use the last 25% of your preamp’s gain knob; you will get extra THD+N and less linear phase response, but it’s sometimes better than leaving dynamic range on the table.
However, there are some even more general conclusions:
-
- More sensitive, lower-self-noise mics placed as far mics, combined with less sensitive, moderately low self-noise mics close up, should in theory hit your preamp with more even gain levels, having similar phase deviations across your mic arrays and thus blending better when aligned in post.
- Therefore, the best room mics are moderately high sensitivity, low self-noise.
- The best close mics are mid to low sensitivity, and self noise is not as relevant.
- You don’t need a low sensitivity mic unless you’re super close mic’ing something or recording a super loud ensemble.
- There is an optimal preamp for every given mic & signal level combo out there, wherein the optimal recording level is the sweet spot of lowest THD+N in the center of the dial.
- Preamps built into budget interfaces are optimal with high sensitivity, low self-noise mics because those mics land right in that sweet spot.
- High-end preamps don’t suffer from high sensitivity mics, though, while being better adapted to handle low sensitivity mics.
- More sensitive, lower-self-noise mics placed as far mics, combined with less sensitive, moderately low self-noise mics close up, should in theory hit your preamp with more even gain levels, having similar phase deviations across your mic arrays and thus blending better when aligned in post.
Time to Plan
Now that we’ve selected our equipment, it’s time to plan our how our session will work and put together a portable recording kit so we can record anything anywhere we need to.